Article 1: A Minimal Home Server Setup That Just Works
No Proxmox. No Kubernetes. Just Linux, Docker, and simple reliability.
Designing the architecture
Deciding what to build, why it exists, and what problems it must not create.
TL;DR
Most Home Server setups online are over-engineered. This series documents a simple, stable Home Server built with Debian and Docker — no Proxmox, no Kubernetes, no unnecessary abstraction. This first article explains the architecture, hardware choices, disk layout, and design philosophy. No commands yet.
Why This Exists
I’m writing this because most Home Server setups I found online are unnecessarily over-engineered.
Many guides jump straight into Proxmox and Kubernetes based designs. It makes very little sense if your goal is simple: reliable storage that runs quietly and doesn’t break every few months.
This setup is intentionally simple.
This first article is theory-only. I’ll explain the architecture, hardware choices, disk layout, and design decisions. Commands and Docker configs will come later. So let’s get started.
My Hardware Overview
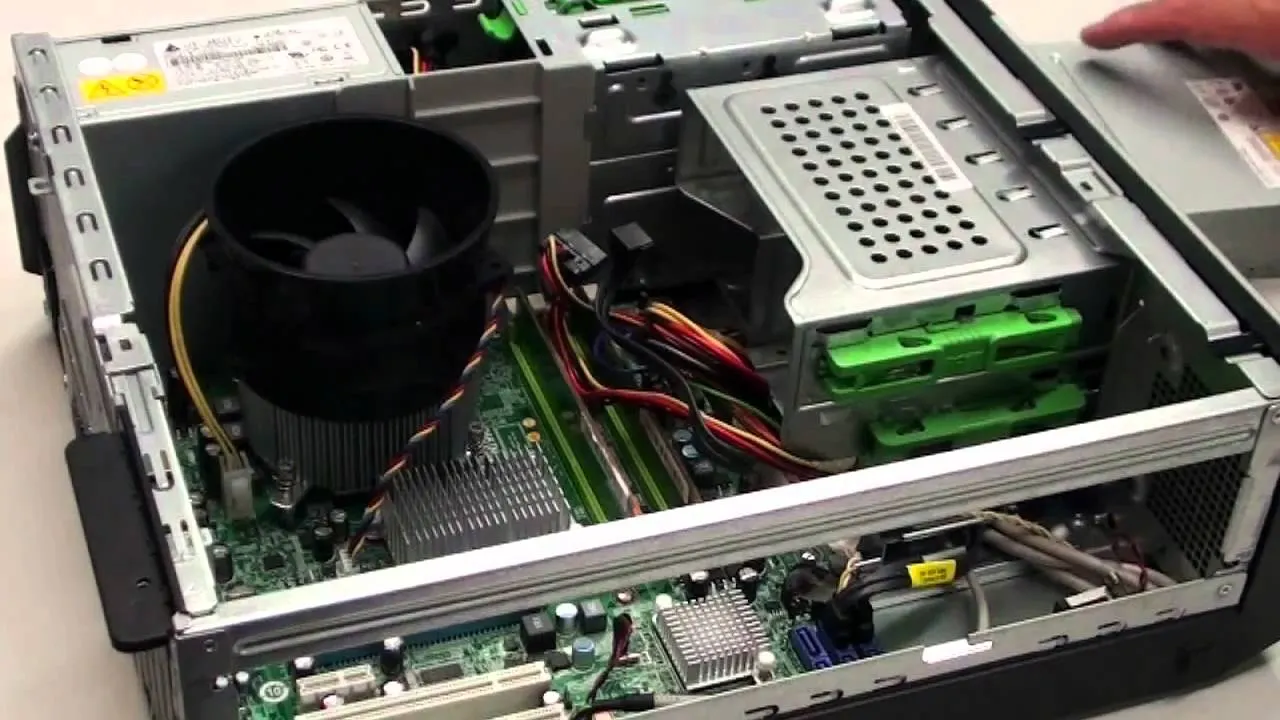
Base system
- Acer Veriton M200 H610 Desktop
- Intel i5 12th Gen (integrated GPU)
- 16 GB DDR4 RAM
- 512 GB SSD (faster boot + Docker IO + logs + DBs)
- UPS (1 kWh)
Storage
- 4 TB WD Red Plus (primary data)
- 1 TB Seagate SkyHawk (backup / redundancy for critical data: not ideal)
Network
- ISP: JioFiber (150mbps Plan)
- Connection via Ethernet, Wifi not recommended for servers.
— Jio Limitations
- IPv6 enabled by default and not fully configurable
- ISP DNS blocks certain services ( will use 8.8.8.8 or 1.1.1.1)
- “Unlimited” plans are capped (~3.3 TB/month on Jio)
Important notes
- Local streaming and file access do not consume ISP data
- Router should support Gigabit Ethernet
- I use a DHCP reservation (configurable on the router) so the Server always keeps the same local IP
- More data or more speed as per personal use. I would prefer more data (cause downloading is fine but uploading is giving back)
Devices
- TV: Connected to the same LAN, uses Jellyfin for media streaming
- Mobile phones and laptops: Access services locally and remotely using Tailscale
Services work locally very well as there is no internet dependency i.e. no real data usage.
Why this hardware?
Availability matters. In India — especially outside major cities — you often can’t get ideal Server hardware on demand. I aimed for WD Red or Seagate IronWolf because they use CMR (Conventional Magnetic Recording), which performs reliably under Server workloads. I ended up with a mixed setup, which is acceptable for a simple Server.
CMR vs SMR: CMRs are faster and SMRs are cheaper as they can get more data data on the same number of drive platters.
NAS drives are tuned for unpredictable read/write patterns. Surveillance drives like SkyHawk are optimised for continuous, predictable writes. They work, but they aren’t ideal for general NAS usage.
If I were buying again, I’d choose another WD Red or IronWolf.
The i5 12th Generation is objectively overkill. Under normal operation, CPU usage stays around 2–3%. The highest load occurred during the initial Immich indexing of a large photo and video library. A desktop also provides far better cooling than most consumer NAS boxes.
I chose a prebuilt system for the extended warranty, which matters more than theoretical efficiency in a home setup.
A dedicated GPU is unnecessary. An integrated GPU is extremely useful for media transcoding and troubleshooting, without adding power draw or complexity.
HDD vs SSD (and Why Both Are Used)
SSD
- Fast, reliable, but expensive per GB
- Used only for OS and Docker
HDD
- Slower than SSDs, but not slow in real-world Home Server usage
- Much cheaper per GB
- Ideal for bulk data storage
In practice, the bottleneck is usually the network, not the disk. For example, a 150 Mbps connection caps transfers at ~18.75 MB/s. SSD write speeds beyond that don’t matter.
HDDs are designed for continuous operation. In stable environments, they often last 5–8 years. Failures still happen — which is why backups matter more than drive choice.
Why Two HDDs (and Why This Is Not RAID)
4 TB HDD
- Stores all bulk data:
- Photos
- Videos
- Torrents
- Media libraries
- General files
1 TB HDD
- Stores only important data:
- Family photos and videos
- Important documents
This data is synced to the 1 TB drive for redundancy using rsync. I store daily incremental backups for last 180 days (like git).
What this means:
- Every day, only changed files are copied
- Older versions remain available for recovery
- Accidental deletion or corruption can be rolled back
This is not RAID. This is selective redundancy for irreplaceable data.
If one drive fails, critical data still exists on the other, giving me time to replace hardware and recover calmly. Yes, both drives could theoretically fail at the same time — but that risk exists even with RAID unless you also have off-device backups.
Advanced setups like RAID or ZFS are powerful, but they add complexity. I’ll discuss them later, but I don’t use them here.
Disk Mount Structure
Simple:
1
2
/mnt/hdd4tb
/mnt/hdd1tb
Operating System Choice
The system runs Debian. Ubuntu would work equally well. Both are stable, well-documented, and predictable.
I deliberately avoid rolling-release distributions like Arch for a Home Server. Frequent updates increase maintenance overhead and raise the risk of breakage on a system meant to run unattended.
Debian’s slower release cycle, conservative defaults, and long-term stability make it ideal for such uses, because I want to setup and them leave it working for long.
Power Considerations
The desktop PSU is rated at ~250 W, which is more than sufficient even with future disk expansion. Actual power draw is far lower under normal Home Server workloads.
The UPS provides:
- Backup power during outages
- Clean, stable voltage
- Protection against sudden shutdowns that can corrupt data
Power reliability is an underrated part of storage reliability.
Networking & Access Model
This setup uses Tailscale, which creates a private, encrypted network between my devices using WireGuard.
Services are not exposed to the public internet. Only authenticated devices on my Tailscale network can access the Home Server.
I also own a .dev domain purchased from Spaceship, with DNS managed via Cloudflare. DNS records point to the Home Server’s Tailscale IP (100.x.x.x range).
This is purely for convenience and consistent naming. Access remains private. Using the IP address directly works just as well.
Example:
torrent.domain.dev- instead of
100.100.x.x:8080
The domain-to-port mapping is handled by Nginx.
Using a domain also enables TLS certificates, giving proper HTTPS (the s matters).
You may use free dns like duckdns.org but it has a lot of limitations. But is great for just local (under same physical network) usage.
Details will be covered later. This section describes architecture only.
Services Running on This Server
All services run as Docker containers with bind-mounted volumes — no Docker volumes.
Meaning:
- Data lives directly on the host filesystem
- I can inspect, back up, or move data without Docker (very useful for Immich, Yamtrack)
Services include:
- Nginx — reverse proxy (name → port mapping)
- Immich — self-hosted Google Photos alternative
- qBittorrent
- Jellyfin + Radarr + Sonarr — media stack
- Komga — manga and books
- Nextcloud — file access and sync
- Jellyseerr — content requests
- Yamtrack — watchlist
- BentoPDF — PDF utilities
- Qui — improved torrent UI
- Samba — SMB file sharing
Each service exists to solve a specific problem. None are deployed “just because”.
NAS : Network Attached Storage
Disk Health & SMART Monitoring
Before trusting any drive with data, I check its health using SMART tools. Installing and verifying smartmontools immediately after buying a disk helps catch early failures.
What I check:
- Power-on hours
- Read/write indicators
SMART does not prevent failures — it only improves visibility. Backups still matter more than any health metric.
Actual commands and interpretation will be covered in the next article.
What’s Next
- Article 2: OS installation, disk preparation, SMART checks
- Article 2.5: Base System Hardening, Utilities & Folder Structure
- Article 3: Docker setup, volume layout, service deployment
- Article 4: Backup strategy, rsync scripts, failure recovery
Also I have build a tool for better docker management which I will discuss later.